Friday, June 30, 2006

Remote LPD queue (LPR printing)

As already noted, we can convert USB printer to network printer with cheap device that consists of router and USB print server. What we have to do is to configure "Remote LPD queue":

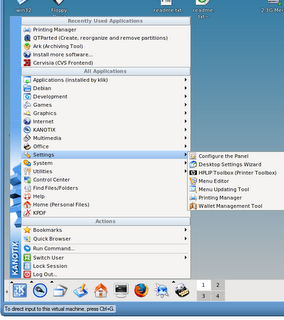
  • Open 'Start menu'->'Settings'->'Printing Manager'

  • Click on printer, click on "Properties" tab, click on icon "Interface" and press button "Change..."

  • Choose "Remote LPD queue"


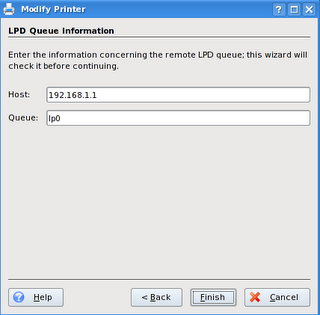
  • Click 'Next >' and define 'Host' and 'Queue'. In our case, values are '192.168.1.1' and 'lp0':

That's it. Printer should work ... It's time for the first test ...

[]

Thursday, June 29, 2006

Cheap Network Printer (black & white laser)

When I started to develop 'doknir', I didn't have a printer. After spending some time searching Slovenian computer stores, I decided to buy B&W laser Samsung ML-1610 (price: 75 EUR). Since this is not network printer, I also bought broadband router with USB print server (Digitus DN 11004 for 35 EUR). So printer+server for less than 139.99 USD. Anyhow, here are instructions how to install both devices to 'doknir':

  • Connect printer to router!
  • Kanotix (Debian Sid) supports many Samsung printers, but ML-1610 is not among them. Fortunately, Samsung has just released new version of "Uniform Driver". Download is here:
    Unified Linux Driver (ver.2.00.90)
  • Unzip the dowloaded file!
  • Start Konsole, enter command 'sux' and move to the folder with unzipped driver.
  • Enter command 'cdroot/autorun' to start 'Add printer wizard'
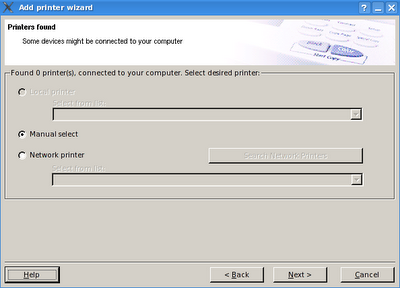
  • Choose "Manual select":

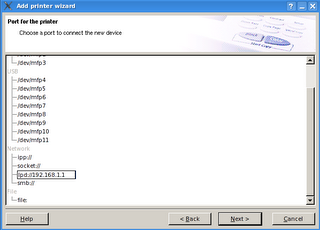
  • As connection select 'lpd://'. LPD address consists of two arguments: an IP address and a queue name. In our case, IP is 192.168.1.1 and queue name is lp0. So LPD address should be lpd://192.168.1.1/lp0. Unfortunately this does not work in Samsung wizard, so add just 192.168.1.1 without queue name. We will repair this later ...
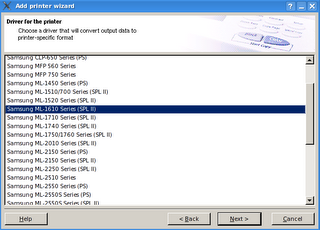
  • Select driver "Samsung ML-1610 Series (SPL II)":

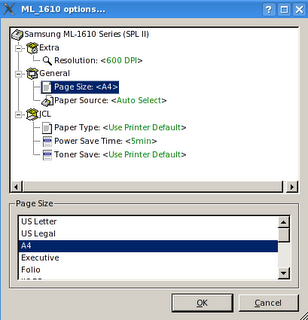
  • In printer options, we can change page size "US Letter" to "A4":
  • Now we can finish the wizard and test the printer. Because of wrong LPD address nothing will happen. To solve the problem, read this post ...

[]

Wednesday, June 28, 2006

Monitoring shared folder

By default, shared folder is mounted as /mnt/hgfs/doknir/. As already noted, hgfs (acronym for VMware's Host Guest File System) is disabled in VMware Player and Server. So we need to modify our doknir Linux executable to monitor /mnt/ntfs/doknir/ or /mnt/fat/doknir/. Details follow:


  • Start Konsole
  • Enter command "sux" and root password
  • Move to folder /home/doknir/prg/
  • Source is located in file "doknir.prg"
  • Replace beginning of the function 'Main' with the following code. You can use MC (Midnight Commander) to edit file. MC in similar to popular DOS utility NC (Norton Commander).
|| *************************
|| function Main(cShareType)
|| *************************
|| * cShareType: 'hgfs' 'ntfs' 'fat'
|| local nF, aF, cF
|| local i
|| local nSec, nReal
|| local cShare, cNiz
|| local oIni
|| ? ' Doknir 0.02b3 '
|| ? '==============='
|| if PCount()=0 .or. cShareType==''
|| cShareType:='hgfs'
|| else
|| cShareType:=Lower(cShareType)
|| endif
|| cShare:='/mnt/'+ cShareType +'/doknir/'
|| ? ' '
|| ? 'shared folder: '+cShare
|| ? ' '
|| // cShare:='/mnt/hgfs/doknir/'
|| cJobPath:=cShare+'win32/jobs/'
|| cTmpPath:=cShare+'win32/tmp/'
  • Save changes and close MC
  • Enter command "./bld.sh doknir". This will use Harbour compiler to translate "doknir.prg" to "doknir.c" and then build executable "doknir". There is no ".exe" in Linux - each file has property whether it is executable or not!
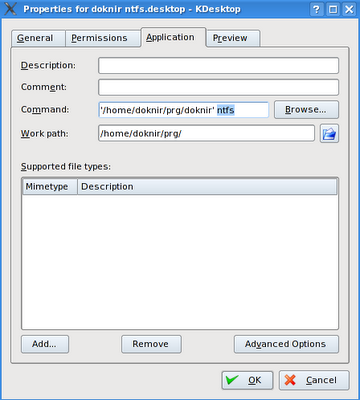
VoilĂ , we have new executable '/home/doknir/prg/doknir' and there is already a shortcut on the desktop. If we want to monitor shared NTFS folder, we must add argument ntfs to the command as shown on the next picture:


[]

Monday, June 26, 2006

Shared Folder

My original implementation of "doknir" is based on feature called "Shared Folders" that is part of "VMware Tools". Unfortunately shared folders capability is enabled only in Workstation and ACE.

BTW, this feature was enabled in early beta of VMware Player, but it was disabled because of security reasons.

If we want to run "doknir" with free VMware products (Server and Player), we need to use another approach: first share folder in Windows XP and then mount it in "doknir". Details follow:

  1. In Control Panel (classic view) open "Folder Options", select "View" tab and disable "Use simple file sharing".
  2. In Control Panel open "User Accounts" and create user "doknir".
  3. Create strong password.
  4. Create folder in Windows host that you want to share with "doknir" virtual appliance.
  5. Right click on new folder and select "Sharing and Security ..."
  6. Select "Share this folder" and set "Share name" to "doknir"
  7. Click on "Permissions" and allow "Full Control". OK and Apply!
  8. Click on "Security" tab. (There is no security tab, if folder is located on FAT32 partition)
  9. Select group "Users" and allow "Full Control". Apply and OK!
  10. In Control Panel open "System" and select "Computer Name" tab. Remember "Full computer name".
  11. Go to the "doknir" virtual appliance and start Konsole. Enter "sux" into command line and press ENTER (default root password is doknir).
  12. Created folders /mnt/ntfs/doknir and /mnt/fat/doknir:
    mkdir -p /mnt/ntfs/doknir
    mkdir -p /mnt/fat/doknir
  13. Mount shared folder (replace text MASTER with computer name that you remember from step 10). The following line is for NTFS folder

    mount -t smbfs -o username=doknir,
    fmask=777,dmask=777,lfs
    //master/doknir /mnt/ntfs/doknir


    and the next line is for FAT folder

    mount -t smbfs -o username=doknir,
    fmask=777,dmask=777
    //master/doknir /mnt/fat/doknir

    In each case "doknir" will prompt you for password. Use the one from step 3.
  14. Read how to monitor shared folder ...

[]

Sunday, June 25, 2006

VMware Server RC2

My license for VMware workstation has expired, so
I've downloaded and installed latest build of VMware
Server (RC2 - build 27828):
http://www.vmware.com/download/server/

Next step is to upgrade VMware Tools. To do this, click
"Install VMware Tools..." in menu "VM". Icon (shape of CD)
with name "VMware Tools" appears on the desktop. Extract
contents "VMwareTools-1.0.0-27828.tar.gz" to /home/doknir/tmp

Start Konsole and type "sux"
( http://fgouget.free.fr/sux/sux-readme.shtml )
Go to folder /home/doknir/tmp/vmware-tools-distrib/
and start ./vmware-install.pl
Press ENTER as reply to all questions.

BTW, after "vmware-install.pl", script "/usr/bin/vmware-config-tools.pl" starts -
here is part of its screen output:

Before running VMware Tools for the first time, you need to configure it by
invoking the following command: "/usr/bin/vmware-config-tools.pl". Do you want
this program to invoke the command for you now? [yes]

Stopping VMware Tools services in the virtual machine:
Guest operating system daemon: done
Guest filesystem driver: done
Deconfiguring network interfaces...done.
Guest vmxnet fast network device: done
Trying to find a suitable vmhgfs module for your running kernel.

None of the pre-built vmhgfs modules for VMware Tools is suitable for your
running kernel. Do you want this program to try to build the vmhgfs module for
your system (you need to have a C compiler installed on your system)? [yes]

Using compiler "/usr/bin/gcc". Use environment variable CC to override.

What is the location of the directory of C header files that match your running
kernel? [/lib/modules/2.6.16.16-kanotix-1/build/include]


...
Detected X.org version 7.0.

Do you want to change your guest X resolution? (yes/no) [no]


...
You must restart your X session before any mouse or graphics changes take
effect.

You can now run VMware Tools by invoking the following command:
"/usr/bin/vmware-toolbox" during an X session.

[]